
You can insert your own tables and also save custom tables for future repurposing. The steps are outlined below:
1. Insert a table by clicking on the Table icon and selecting "Insert Table"
2. Set the number of columns and rows (can add rows/columns or change settings later)
3. Be sure to enter tablebody in the class field so Collage will use the correct style (font and size) for your table.
4. Click OK to insert the table
5. Now you can work with the table and enter data
6. You can select the table by clicking on it (or use tab key from within a field) and then go back to the Table icon to edit the table setting (or add/delete rows, etc.)
7. To save a table setup for future use, go to the Source tab and select all of the table code (starting with <table and ending with /table>, copy the selected text
8. Go to the Project tab and select Contribution Setup
9. Select "Standard Document" from the Document Type list.
10. Select the "Standard Document.ddf" file.
11. Click on "Body Text"
12. Click on "Define Reusable Content"
13. Click on "New"
14. Name the code snippet and then paste the table code you have copied
15. Click "Apply"
16. Check in the ddf and approve
17. Table code will now be available in all Body Text fields via the "Content" icon
Tuesday, March 25, 2008
Avoid the never ending list
Many users have complained that they can't end a list once they start one. When you click on the "List" icon in the header menu, you can easily add an ordered or unordered list to your page. When you click the "Return" key it prompts you to add another item to the list. Usually two quick clicks of the Return key will end the list and return your cursor to the left margin. However, if you ever get "stuck in a list" and pressing the Return key continues to give you a new list-item prompt, simply click the "Outdent" icon in the header menu and you will be out of the list.
Wednesday, March 5, 2008
Clearing all formatting
When you are working in the Collage editor you may sometimes have unwanted bold, italics or other formatted text. Sometimes selecting a bold word, phrase or paragraph and clicking the Bold icon fails to unbold the text. You can clear any formatted text by selecting it (you can use the select-all command, ctrl-a on the PC, to select all your text) and then clicking the "Clear Formatting" link at the bottom right corner of the editor window.
Search to save time
Note: You must have Deploy Folders access to do this. (You should be able to see "Deploy Folders" under the Content tab.)
If you have been working on a bunch of files in various folders, you'll find that it's very tedious and annoying to have to go hunting for files that need to be checked in or approved. Collage has a handy search function that will allow you to find all files that are checked out or that need to be approved.
Go to the Content tab and switch to the the Search area.

Select the checkbox next to "User" to see who has what files checked out. The default user is you ("current user"), but you may also search for "any user" or a specific user. Clicking the Search button will show you all the files that are checked out.

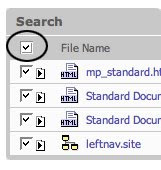
To check in all the files at once, select the checkbox above the checkboxes for the individual file names. This will select all the files in the list and then you can click the Check In icon to check the files in.
Finding all the files that need to be approved is a similar process. In the Search area, deselect the "User" checkbox and select the "Approval" checkbox. (If you have them both selected, it will search for files that are checked out AND not approved.)
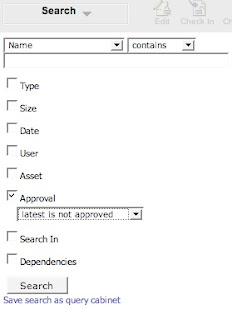
Search for "latest is not approved" and click the Search button. To approve all the files at once, select the checkbox above the checkboxes for the individual file names. This will select all the files in the list and then you can click the Approve icon to approve all the files.
If you have been working on a bunch of files in various folders, you'll find that it's very tedious and annoying to have to go hunting for files that need to be checked in or approved. Collage has a handy search function that will allow you to find all files that are checked out or that need to be approved.
Go to the Content tab and switch to the the Search area.

Select the checkbox next to "User" to see who has what files checked out. The default user is you ("current user"), but you may also search for "any user" or a specific user. Clicking the Search button will show you all the files that are checked out.

To check in all the files at once, select the checkbox above the checkboxes for the individual file names. This will select all the files in the list and then you can click the Check In icon to check the files in.

Finding all the files that need to be approved is a similar process. In the Search area, deselect the "User" checkbox and select the "Approval" checkbox. (If you have them both selected, it will search for files that are checked out AND not approved.)

Search for "latest is not approved" and click the Search button. To approve all the files at once, select the checkbox above the checkboxes for the individual file names. This will select all the files in the list and then you can click the Approve icon to approve all the files.
Welcome...
I was attempting to figure out a way to best present this information and after struggling a bit trying to add it to the Collage training site, I decided to make a blog.
This way you can subscribe to the RSS feed to be notified every time a new tip is added. Also, this system will make it easy for anyone on the Creative Services team to add a tip and for anyone in the Collage user community to comment on the content.
This way you can subscribe to the RSS feed to be notified every time a new tip is added. Also, this system will make it easy for anyone on the Creative Services team to add a tip and for anyone in the Collage user community to comment on the content.
Subscribe to:
Comments (Atom)