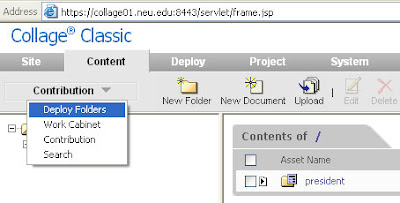
In Serena Collage, most of the work involved in editing files takes place in the Content > Contribution view. Similar work can also be accomplished in the Content > Deploy Folders view. However, your editing capabilities are affected by the view you select.
Some tasks can only be performed in the Contribution view, while others are only accessible through the Deploy Folders view. The list of tasks below shows some situations where you might have to switch from one view to the other.
Creating files
You must be in the Content > Contribution view to create new files.
In the Content > Deploy Folders view, clicking the New button only enables the creation of a blank HTML file or the uploading of a file from your hard drive.
Changing file names
In the Content > Contribution view, file names cannot be changed.
To change the name of a file, select Content > Deploy Folders and edit the file's properties.
Approving multiple files at one time
In the Content > Contribution view, only one file can be approved at a time.
To approve multiple files at once, switch to the Content > Deploy Folders view.
Approving a site structure
When editing and checking in a site structure, you normally use the Site tab. However, to approve a site structure, you must switch to the Content > Deploy Folders view and approve the site structure inside the site_structures folder.
The site_structures folder is not available in the Content > Contribution view.
Tuesday, May 20, 2008
Wednesday, May 7, 2008
Changing a file name in Serena Collage
Changing file names is an issue that occasionally crops up with Collage users around campus.
When changing a file name, the important thing to remember is that this action cannot be performed in the Content > Contribution view, which is where most site editors perform most of their tasks. Instead, a file name is changed in the Content > Deploy Folders view.
Thus, the first step in changing a file name is selecting Content > Deploy Folders.

Next, navigate through the folders until you see the file that needs a different name. In the image below, the file named arst.xml needs to be changed.

Once you see the file, you must check the file out and edit its properties. In the Content > Deploy folders view, the easiest way to do this is by clicking on the file icon to the left of the file name.

This will open the file's properties window.

Click the Check Out icon to make the File Name field editable. Then, enter the new file name. Leave the file extension, which in this case is ".xml".
Click the Check In icon to apply the name change. Click OK in the next two popup windows, and then close the properties window.
Remember, you must approve the file before deploying it for the change to take effect.
When changing a file name, the important thing to remember is that this action cannot be performed in the Content > Contribution view, which is where most site editors perform most of their tasks. Instead, a file name is changed in the Content > Deploy Folders view.
Thus, the first step in changing a file name is selecting Content > Deploy Folders.

Next, navigate through the folders until you see the file that needs a different name. In the image below, the file named arst.xml needs to be changed.

Once you see the file, you must check the file out and edit its properties. In the Content > Deploy folders view, the easiest way to do this is by clicking on the file icon to the left of the file name.

This will open the file's properties window.

Click the Check Out icon to make the File Name field editable. Then, enter the new file name. Leave the file extension, which in this case is ".xml".
Click the Check In icon to apply the name change. Click OK in the next two popup windows, and then close the properties window.
Remember, you must approve the file before deploying it for the change to take effect.
Subscribe to:
Comments (Atom)